1 e4 c5 2 Nf3 e6 3 d4 cxd4 4 Nxd4 Nf6 5 Nc3 d6
6 Be2 a6 7 O-O Be7 8 f4 O-O 9 Kh1 Qc7 10 a4 Nc6
11 Be3 Re8 12 Bf3 Rb8 13 Qd2 Bd7 14 Nb3 b6 15 g4
15 ... Bc8 16 g5 Nd7 17 Bg2 Bb7 18 Qf2 Bf8 19 Rad1
19 ... Nb4 20 Rd4 d5 21 exd5 exd5 22 Rd2 Line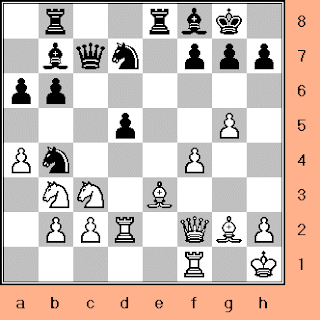
1 e4 c5 2 Nf3 e6 3 d4 cxd4 4 Nxd4 Nf6 5 Nc3 d6: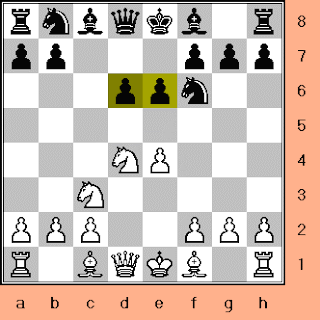
The "Humble" Scheveningen Center (d6-e6)
Black's center is actually full of defensive and
offensive potential. It's also able to allow for
the smooth development of his pieces. Both
bishops are ready to come out to e7 and d7.
The knight has c6, his majesty is just about
ready to castle, and her ladyship has a5-d8,
particularly c7.
6 Be2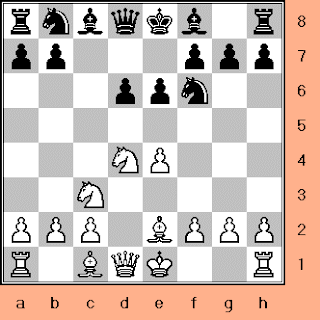
As if in spirit with Black's play, White goes
for a shy but useful development of the kingside.
On f1, the bishop eyes the f1-a6 diagonal.
Now, however, it also checks out d1-h5.
White has just made it more difficult for
Black to use the light squares. For instance,
the f6 knight can forget about redeveloping
to g4 or h5.
On another level, the bishop clears the way
for kingside castling.
6 a3
6 a4
6 f3
6 f4
6 g3
6 g4
6 h3
6 Bb5+
6 Bc4
6 Bd3
6 Be3
6 Bg5
6 Qe2
6 Rg1
6 ... a6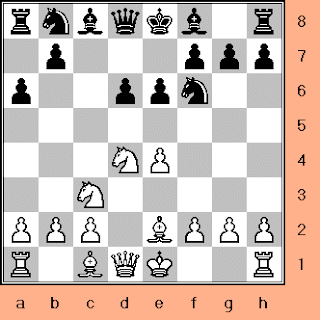
(i) Prevents White's pieces from going to b5,
where they are likely to threaten Black's
position. Take the case of an unchallenged
Ndb5: It works with the d1 Queen to bug the
d6 pawn, menaces a King-rook fork
on c7, and, denies Black the use of that
same square.
(ii) Prepares for a potential ... b5 attack.
Black continues to keep to himself while
simultaneously leaving room for assault.
6 ... e5
6 ... h6
6 ... Be7
6 ... Nbd7
6 ... Nc6
6 ... Qa5
6 ... Qd7
6 ... Qe7
7 O-O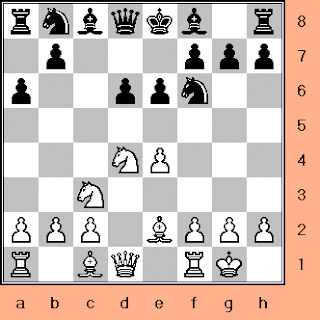
ECO CODE: B 85
7 a3
7 a4
7 f4
7 g4
7 Bb5+
7 Bc4
7 Be3
7 Bf3
7 Bg5
7 Qd2
7 ... Be7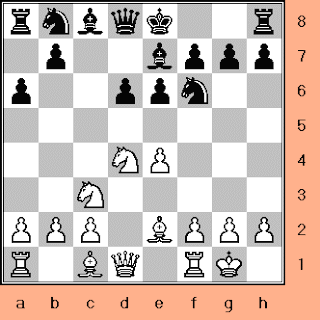
So that the King can castle.
7 ... a5
7 ... b5
7 ... h6
7 ... Nbd7
7 ... Nc6
7 ... Nfd7
7 ... Qa5
7 ... Qb6
7 ... Qc7
7 ... Qd7
Sicilian Scheveningen Part I (Classical Variation)
Sicilian Scheveningen Part II (Classical Variation)
8 f4 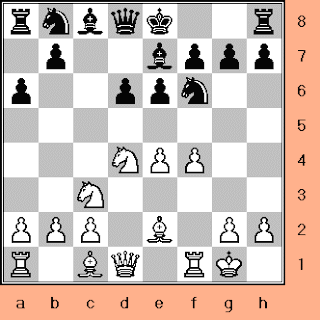
Joining its e4 companion in the fight for the
center. A possible e4-e5 or f4-f5 now hangs
over Black's head.The first advance gains
space and threatens the f6 knight. The second
also takes ground, but it harasses e6 instead,
together with the d4 knight.
8 a3
8 a4
8 Bd3
8 Be3
8 Bg5
8 Kh1
8 Nf3
8 Rb1
8 Re1
8 Qd2
8 Qd3
8 ... O-O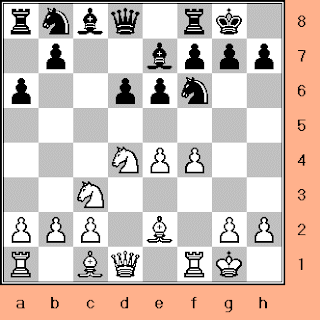
Sicilian Scheveningen Part III (Classical Variation)
9 ... Qc7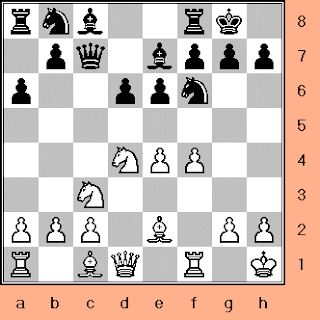
(i) Takes control of the half open c-file.
(ii) Eyes e5, together with the d6 pawn.
Thus, White cannot strike with an unmatched
e4-e5.
c7 is an important post for the Queen, and
that's why Black does well to safeguard her
presence there by 6 ... a6.
9 ... b5
9 ... Bd7
9 ... Kh8
9 ... Nbd7
9 ... Nc6
9 ... Nfd7
9 ... Qa5
9 ... Qb6
9 ... Qd7
9 ... Re8
Sicilian Scheveningen Part IV (Classical Variation)
9 Kh1 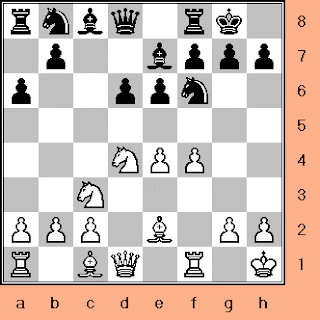
Since the g1-a7 diagonal has been opened
up by 8 f4, the King moves away from it.
There's no point in exposing himself to
potential check. Also, if he remains
on g1, the d4 knight might get taken by
such moves as ... Qb6 followed by ... e5.
It's usually a good idea to remove threats
before they become annoyingly real.
9 a3
9 a4
9 e5
9 g4
9 Be3
9 Bf3
9 Qd2
9 Qd3
9 Qe1
9 Rb1
9 ... Qc7
(i) Takes control of the half open c-file.
(ii) Eyes e5, together with the d6 pawn.
Thus, White cannot strike with an
unmatched e4-e5.
c7 is an important post for the Queen, and
that's why Black does well to safeguard her
presence there by 6 ... a6.
9 ... b5
9 ... Bd7
9 ... Kh8
9 ... Nbd7
9 ... Nc6
9 ... Nfd7
9 ... Qa5
9 ... Qb6
9 ... Qd7
9 ... Re8
Sicilian Scheveningen Part V (Classical Variation)
10 a4 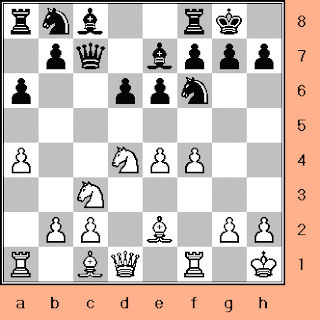
White makes it difficult for Black to play ... b5.
He also gains space on the queenside. However,
b4 is now very much open to Black's pieces.
10 a3
10 f5
10 g4
10 Bd3
10 Be3
10 Bf3
10 Qd3
10 Qe1
10 Rb1
10 Rf3
10 ... Nc6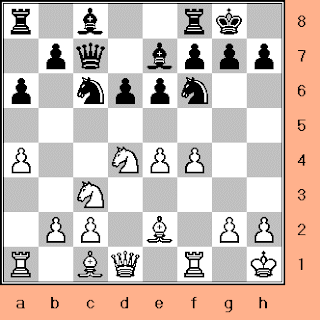
Further keeping e4-e5 in check and challenging
White's control of d4. The knight also has its
eyes on b4, obviously.
10 ... b6
10 ... h6
10 ... Bd7
10 ... Kh8
10 ... Nbd7
10 ... Nfd7
10 ... Rd8
10 ... Re8
Sicilian Scheveningen Part VI (Classical Variation)
11 Be3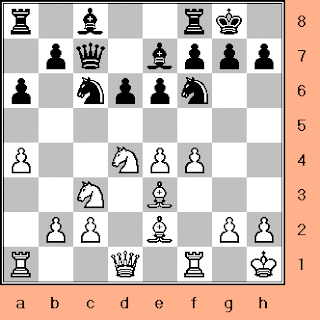
Covers the open g1-a7 diagonal, particularly d4.
Please observe how the bishop cannot be
attacked by ... Ng4, thanks to White's
early grip of d1-h5 (6 Be2).
11 h3
11 Bf3
11 Nb3
11 Nxc6
11 Qd2
11 Qd3
11 Rb1
11 ... Re8 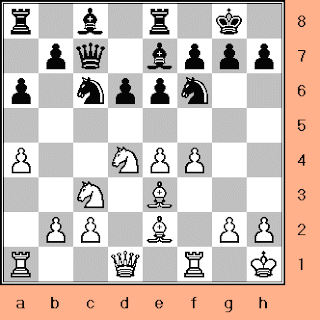
Even though there are several pieces between
the rook and unprotected e3 bishop, Black
still takes a shot at it. Should the e-file
open up too soon, the bishop is a goner.
In any event, the rook is well-placed to
influence affairs down that center lane.
Furthermore, it makes f8 available to the
bishop for defense of the kingside.
11 ... e5
11 ... Bd7
11 ... Kh8
11 ... Na5
11 ... Nb4
11 ... Nd7
11 ... Nxd4
11 ... Qa5
11 ... Rb8
11 ... Rd8
Sicilian Scheveningen Part VII (Classical Variation)
12 Bf3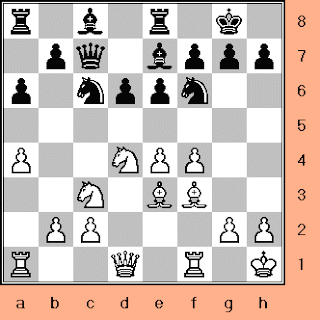
Assuming control of the more promising h1-a8.
The bishop's scope along this diagonal will
be increased, if White can get in e4-e5.
12 a5
12 f5
12 g4
12 Bd3
12 Bf2
12 Bg1
12 Kg1
12 Nb3
12 Nf3
12 Nxc6
12 Qd2
12 Qd3
12 Qe1
12 Rb1
12 ... Rb8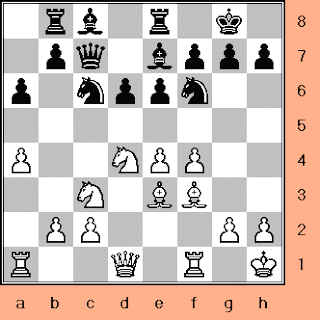
(i) Makes sure the rook never gets in touch
with the f3 bishop. It's always a good idea
to remove an important piece from the indirect
fire of a lesser one.
(ii) Takes charge of the b-file in order to
support a timely ... b5 and also attacks b2
in a roundabout way.
12 ... e5
12 ... h6
12 ... Bd7
12 ... Bf8
12 ... Kh8
12 ... Na5
12 ... Nd7
12 ... Nxd4
13 Qd2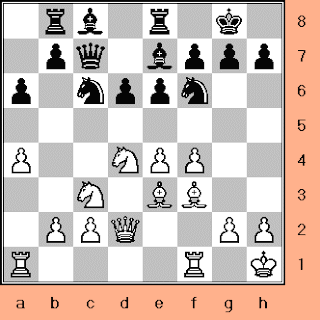
White covers e3 and also readies the Queen
for f2. Once there, she can work with the
bishop to clamp down on g1-a7. Moreover,
he makes room on d1 for the a1 rook.
The idea is to keep control of the half
open d-file, once the Queen goes to f2.
13 e5
13 g4
13 h3
13 Bf2
13 Bg1
13 Nb3
13 Nde2
13 Qd3
13 Qe1
13 Qe2
13 Rb1
13 Rc1
13 Re1
13 ... Bd7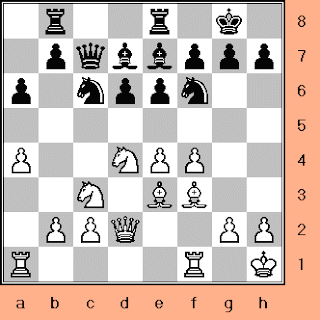
The plan is to make c8 available to a rook,
should the need arise. That way, Black can
get twice the firepower down that important
avenue. The other idea is to further support
a timely ... b5. Black's bigger design, however,
is to fight for h1-a8 by first developing the
c6 knight elsewhere, followed by ... Bc6.
13 ... e5
13 ... Bf8
13 ... Na5
13 ... Nd7
13 ... Nxd4
13 ... Qa5
13 ... Rd8
Sicilian Scheveningen Part VIII (Classical Variation)
14 Nb3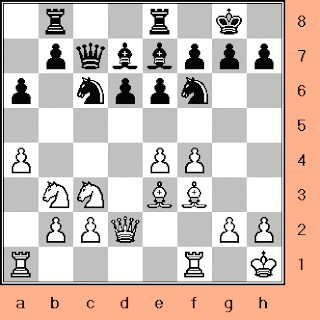
Since ... Nxd4 conveniently falls in line
with Black's ... Bc6 attempt, White denies
him of it. He also fights for c5 and prepares
for a4-a5.
14 Be2
14 Bg1
14 Qd1
14 Qd3
14 Qf2
14 Rad1
14 Rae1
14 ... b6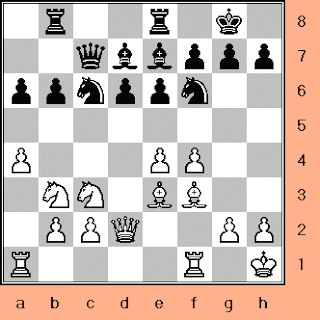
He doesn't want White to advance further
with a4-a5 nor question his control of c5.
Incidentally, b7 has opened up as an
alternative post for the bishop.
The h1-a8 diagonal is just as accessible
from there as from c6.
14 ... b5
14 ... e5
14 ... Bc8
14 ... Na5
14 ... Nb4
14 ... Ra8
14 ... Rbc8
14 ... Rbd8
15 g4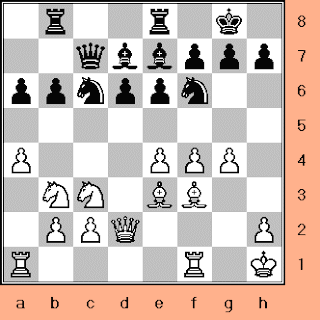
(i) Gains ground.
(ii) Threatens the f6 knight.
The King isn't too exposed thanks to the
f3 bishop. White shouldn't therefore be
in too much of a hurry to exchange this
guardian or move it away from h1-a8.
15 a5
15 Bf2
15 Kg1
15 Qe1
15 Qe2
15 Qf2
15 Rac1
15 Rad1
15 Rae1
15 Rfd1
15 ... Bc8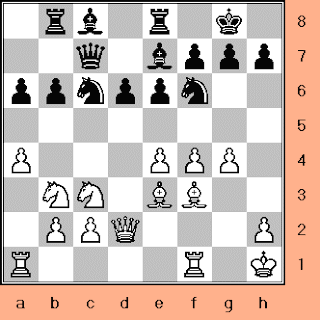
On its way to b6, especially since the
knight will soon need d7 for retreat.
15 ... e5
15 ... h5
15 ... h6
15 ... Kh8
15 ... Rec8
15 ... Red8
15 ... Rf8
Sicilian Scheveningen Part IX (Classical Variation)
16 g5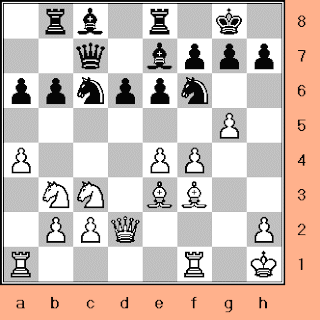
Attacking the knight and gaining more
kingside space.
16 Kg1
16 Kg2
16 Qd3
16 Qe2
16 Qf2
16 Rac1
16 Rad1
16 Rae1
16 ... Nd7 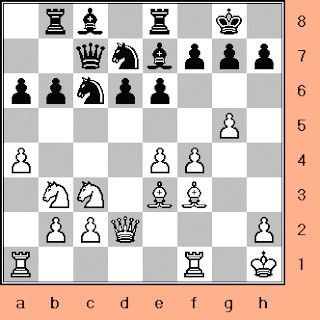
(i) Avoids capture.
(ii) Keeps an eye on e5, together with the Queen,
c6 knight and d6 pawn. Also checks out c5 and b6.
Such a purposeful withdrawal!
17 Bg2 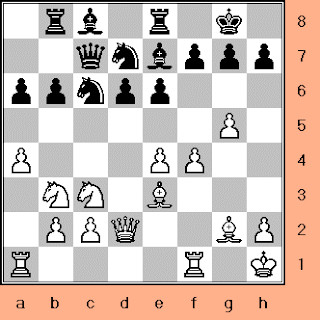
Gives the f1 rook access to the f-file, especially
since f4-f5 might be in the works.
17 h3
17 h4
17 Kg1
17 Kg2
17 Qf2
17 Qg2
17 Rad1
17 ... Bb7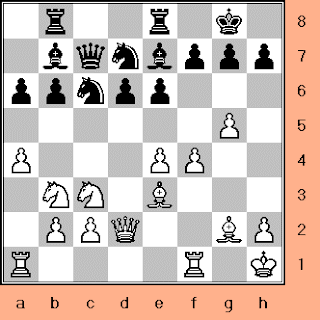
Finally, Black is competitive along h1-a8.
17 ... Bf8
17 ... Kh8
17 ... Na5
17 ... Nc5
17 ... Nf8
17 ... Ra8
17 ... Rd8
17 ... Rf8
Sicilian Scheveningen Part X (Classical Variation)
18 Qf2 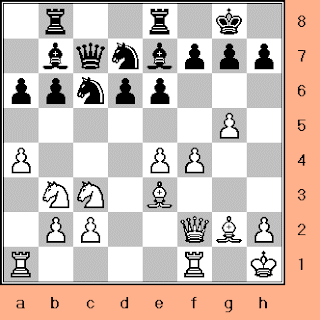
The Queen and e3 bishop take aim at b6, plus,
her ladyship and the rook assume double
control of the f-file. If White should open
up this line via an unchallenged f4-f5,
the duo's power will be felt on f7.
18 a5
18 Kg1
18 Qd1
18 Qe2
18 Rad1
18 Rae1
18 Rf2
18 Rf3
18 ... Bf8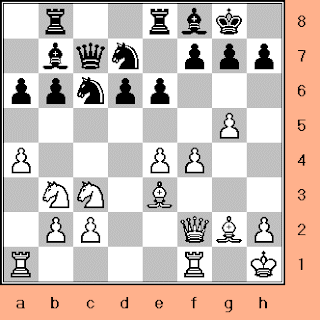
Now the e8 rook gets a better view of the e-file.
The bishop can also be used to defend against
White's kingside threats (... g6 followed
by ... Bg6).
18 ... Bc8
18 ... Kh8
18 ... Nb4
18 ... Nc5
18 ... Rbc8
18 ... Rbd8
18 ... Rec8
18 ... Rf8
19 Rad1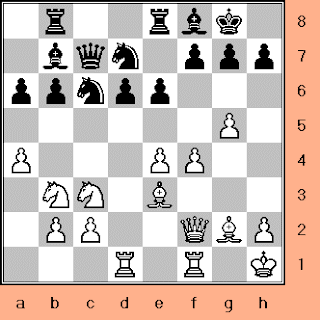
Rooks love half open files, in addition to
open ones!
19 f5
19 Kg1
19 Qg3
19 Qh4
19 Rab1
19 Rac1
19 Rae1
19 ... Nb4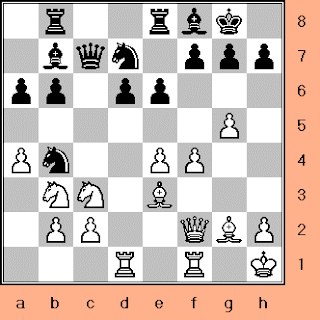
(i) Gives the b7 bishop a clearer view of the
a8-h1 diagonal.
(ii) Keeps an eye on c2.
(iii) Aids a ... d5 break. The offensive and
defensive potential of Black's "humble"
center will shortly be unleashed!
19 ... g6
19 ... Be7
19 ... Kh8
19 ... Nc5
19 ... Ne7
19 ... Ra8
19 ... Rbc8
19 ... Rbd8
Sicilian Scheveningen Part XI (Classical Variation)
20 Rd4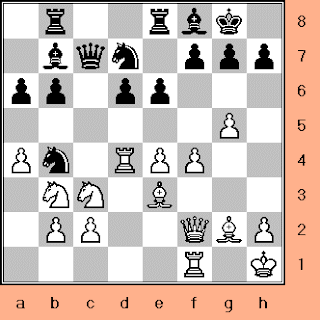
Asking the unwelcome b4 guest to leave
or risk capture.
20 a5
20 f5
20 h3
20 Bd4
20 Kg1
20 Rd2
20 Rfe1
20 ... d5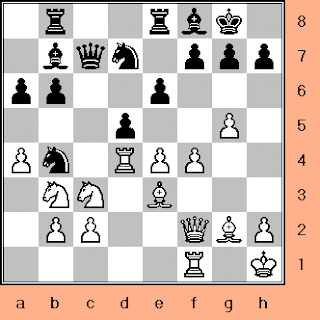
But not if Black has anything to say about it.
This move allows the f8 bishop to protect the
b4 knight and it also attacks White's menacing
center.
20 ... a5
20 ... Nc6
21 exd5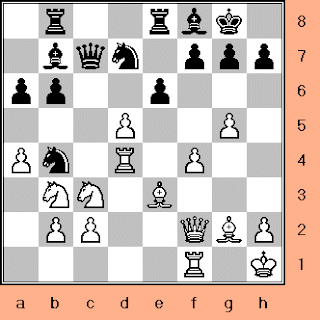
Hoping to give Black an isolated d-pawn.
White can then put pressure on it by
doubling up on the d-file.
21 e5
21 g6
21 Kg1
21 Qe2
21 Rdd1
21 Rd2
21 Rfd1
21 ... exd5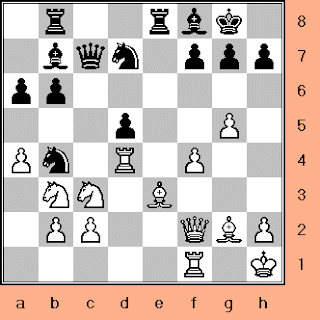
21 ... f5
21 ... Bc5
21 ... Bd6
21 ... Bxd5
21 ... Nxd5
21 ... Qc8
21 ... Rbc8
22 Rd2 
Moves away from the vulnerable d4 square,
clears up g1-a7 for the Qf2-Be3 tandem, and,
keeps d1 available for the other rook. The
fact that White's fearsome position has now
been tamed is proof of the Scheveningen's
ability to prickle and repel!
22 a5
22 g6
22 Re1